Pinnacle Studio Review 2022: Sleekest Video Editor Ever?
Pinnacle Studio
Resumo
Há muito o que amar Pinnacle Studio. It has the best user interface I’ve ever come across in a video editor, the most usable and professional templates in its class of video editors, and some the sleekest ease-of-use features in the business. It comes with tons of cool bells and whistles. At the end of the day, though, is that what makes a video editor worth your money?
For me, the bottom line when it comes to video editors is the quality of videos it can produce for the price you pay. Pinnacle excels at generating quality in certain categories but fails to deliver a substantial increase in quality for the increased price of Pinnacle Studio Plus and Pinnacle Studio Ultimate.
It’s my opinion that users who are interested in a modern, efficient, well-organized, and easy-to-use program will get their money’s worth out of the basic edition of Pinnacle Studio, but that the Plus and Ultimate editions don’t offer nearly as much bang for their buck as you’ll find from other video editors in the alternatives section below.
O que eu gosto: The UI is highly modern and intuitive, and the program looks and feels excellent. Toolbar and hotkey customization further improve the ease of use. Keyframe editing offers a high degree of control over the project. Templated intros and outros look excellent. Video transitions are easy to apply and highly usable.
O que eu não gosto: The majority of the effects look too poor to use in an actual project. It occasionally crashes and suffers lag spikes when applying effects, rendering the program temporarily unusable. Strange, unpredictable behavior occurs when moving elements of the project around in the timeline.
O que é Pinnacle Studio?
It is a video editor for beginner and intermediate level users. The program offers thousands of video effects, templates, and sound effects out of the box, and is best suited for those who are interested in getting all of the media content for their videos in one place.
Pinnacle Studio Basic vs. Plus vs. Ultimate
Pinnacle Studio is the cheapest, and this is the version I feel offers the most value. The Plus edition costs a bit more, and adds 300 effects, 3D editing, and screen capture tools. The Ultimate edition is the most expensive and adds several hundred more effects from NewBlue, as well as motion tracking for blur effects and morph transitions.
Is there a free trial version with Pinnacle Studio?
Unfortunately, Corel does not offer a free trial for its latest version. That’s why I decided to purchase the software on our own budget to test drive its capabilities. But it does offer a 30-day money-back guarantee.
Where can I download Pinnacle Studio?
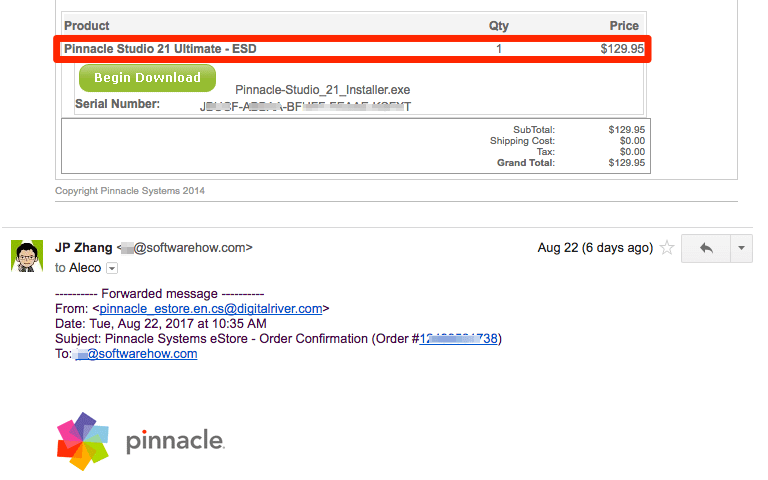
All three versions of the software are available on its official website. Once you purchase the program (be sure to choose the right version), an email will be sent to you, and you’ll find a downloadable link inside. See the screenshot below.
Does Pinnacle Studio work on Mac?
Unfortunately, it does not. The program is for Windows PCs only. I’ll recommend an excellent video editor for Mac users in the “Alternatives” section of this article.
Índice analítico
Por que confiar em mim para esta revisão?
My name is Aleco Pors. Video editing has been a serious hobby of mine for eight months. During this time I have created videos for both personal and commercial use with a variety of editing programs and have reviewed many of them on TechFewer.
I’ve taught myself how to use professional quality editors such as VEGAS Pro, Adobe Premiere Pro, and Final Cut Pro (Mac). I also had the opportunity to test several editors which are catered toward less experienced users, like Cyberlink PowerDirector, Corel VideoStudioe Vídeo Nero. I understand what it means to learn a new video editing program from scratch, and I have a good sense of the quality and features you should expect from an editing program at different price points.
My goal is for you to walk away from this Pinnacle Studio review knowing whether or not you’re the kind of user who will benefit from purchasing the program, and that you’ll feel as though you were not being sold anything in the process.
Our TechFewer team used our own budget and purchased a full license for Pinnacle Studio Ultimate (see the screenshot below for the purchase receipt) so that I could test out every feature of the program for this review.
We have not received any payment or requests from Corel that would influence the content of this review in any way. My goal is to deliver my complete and honest opinion about the product, highlight the program’s strengths and weaknesses, and to outline exactly who this software is best suited with no strings attached.
Also, in case you are interested in getting a feel of the output of the program, I’ve made a quick video here (it’s not fully edited though).
Detailed Review of Pinnacle Studio Ultimate
The UI for this vide editing program is unquestionably the sleekest, sexiest, and most customizable I have encountered in a video editor. If look and feel are the most important qualities you look for in a piece of software, then you’re likely to be quite happy with Pinnacle Studio.

The program is organized into four main sections. Each can be easily accessed at the top of the screen in the bar pictured above. I’ll step through each of these sections, then give you a quick rundown on my opinions of the effects, templates, and transitions included in the program.
The Home Tab
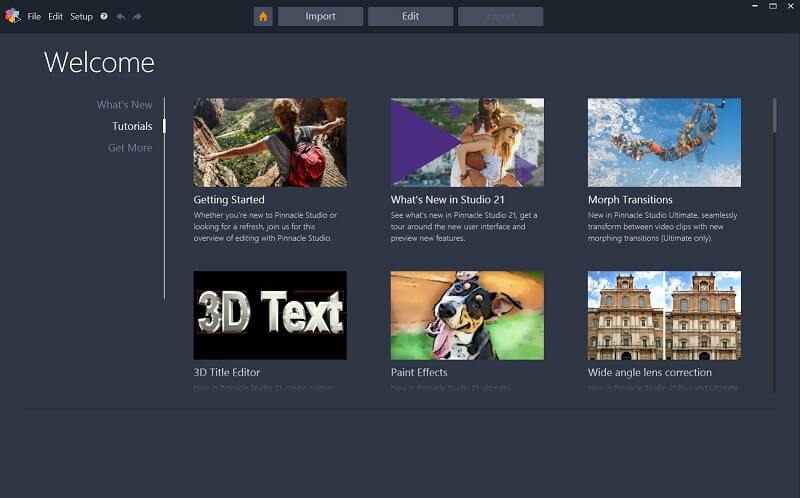
The home tab is where you’ll find all the tutorials, new features, and paid add-ons that Pinnacle has to offer. There’s a great deal of overlap between the “What’s New” and “Tutorials” tab, and I wasn’t as impressed by these tutorial videos as I was by the ones which can be found in competing programs.
Clicking on the “Getting Started” tutorial takes you to a page that lets you know that this video is “coming soon”, which is unacceptable for a program catered towards newer users. The other tutorials explain a singular feature of the program, but they are far from exhaustive and seem a little unprofessional at times.
The Import Tab

The Import tab is where you can permanently link files with the program to be used in your projects. You can import files from DVDs, your desktop, or directly from a video device that is plugged into your computer. Files that are added to the program in this way are added to a “Bin” to be accessed any time you like in future projects.
I found this tab to be a little too clunky and slow to be practically useful. It takes the program a decent amount of time to load and import media into the project through this tab. You can easily drag and drop media from your desktop into your projects in the Edit tab instead of having to navigate through drop-down lists of folders in the Import tab.
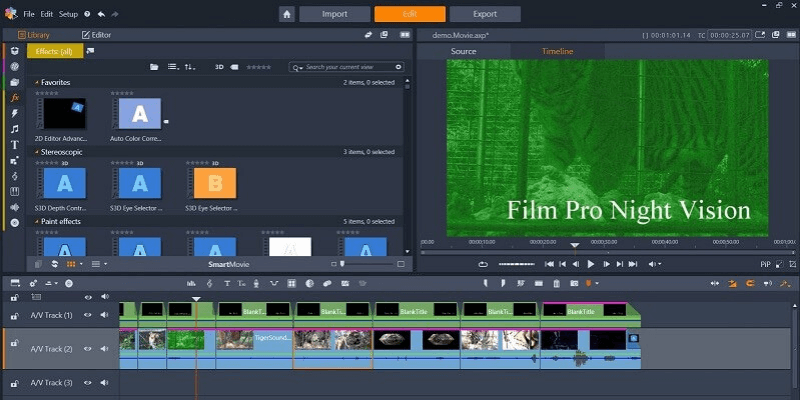
The Edit Tab and Primary UI
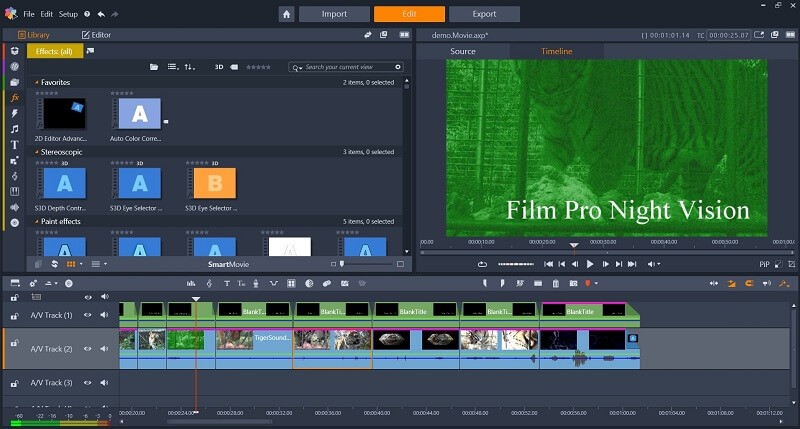
The meat and bones of the program, the Edit tab is where you’ll splice together your videos and apply effects to them. Though the primary way in which the program is organized in the Edit tab is nearly identical to that of most other video editors you’ll find, what makes Pinnacle Studio’s UI stand out amongst its competition are its rich toolbars, impeccable attention to detail, and numerous features which emphasize ease of use.
You’ll find five (five!) toolbars scattered throughout the UI. The toolbar in the upper left changes what is visible in the box next to it. It allows you to navigate through the media you’ve imported into the project, the media available to you, and the various effects and transitions which can be applied to your pictures and videos.
The toolbars along the middle of the screen allow you to perform a wide variety of other tasks and features, including motion tracking and split screen tracking and are completely customizable. Every button on the middle toolbar can be checked on or off in the Ultimate edition, a welcome addition that I found to be a bit cooler than it was useful.
The windows in the top half of the screen are the Video Preview window and the Editor/Library window. These three windows can be swapped, displayed as two windows in halves or three windows in thirds, or popped out and dragged to a second monitor. As these windows are where you’ll do most of the heavy lifting in Pinnacle Studio, having the ability to put them exactly where they work best for you is an amazing addition.
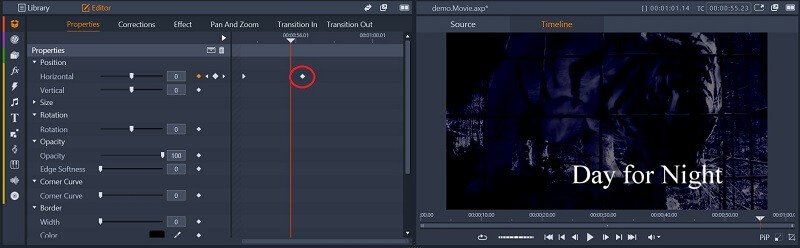
One of my favorite features in the entire program is the Editor window shown above. Here, you are able to set keyframes anywhere in your video so that you can adjust the exact parameters of your clips. You can apply effects, colors, pans, and resizes from this window without having to slice your clips into tons of tiny sections like you would in other programs. This offers you an extremely high degree of control over your project in a manner that is easy to understand and simple to execute.

This brings us to the timeline, which has some of the nicest UI features I’ve yet to encounter in a video editor. Buttons in the second toolbar from the left in the middle row allow you to hide or show opacity settings and audio levels; tracks can be easily locked, added, and hidden; and a progress toolbar appears above each element in the timeline which is in the process of having an effect applied to it (one of my favorite features in the entire program). All of these features go a long way toward making a clean and comfortable user experience, the greatest strength of Pinnacle Studio.
The one major fault I found with the UI is related to the timeline. The default behavior in many situations is to overlap new elements on top of old ones instead of moving old elements out of the way, which is a very different behavior from that of the other video editors I have used.
I can’t think of many situations where I would want to have a new clip inserted in the middle of an existing clip in my timeline instead of having the clip added to the end or beginning of the existing clip, yet this is what often happened when I dragged a clip into the program’s timeline. Outside of these quirks with the timeline, the UI of the program is impressive.
Video Effects, Transitions, and Templates
When it comes to video editors in this price range, most of the primary functions these programs can accomplish are very similar. The way in which you go about accomplishing those primary functions might be different, but every editor should be capable of cutting clips together, adding music and sound effects, applying chroma keys, and adjusting the lighting and color.
Outside of the UI, the biggest thing which separates video editors like Pinnacle Studio from its competition are the video effects, transitions, and templated projects available in the program. As any two programs will produce the exact same result after cutting two clips together, these aspects of the program are what will give your videos the look and feel which is unique to the program.
The basic version comes with 1500+ effects, templates, titles, and transitions. As the versions increase in price so does the number of pre-made effects.
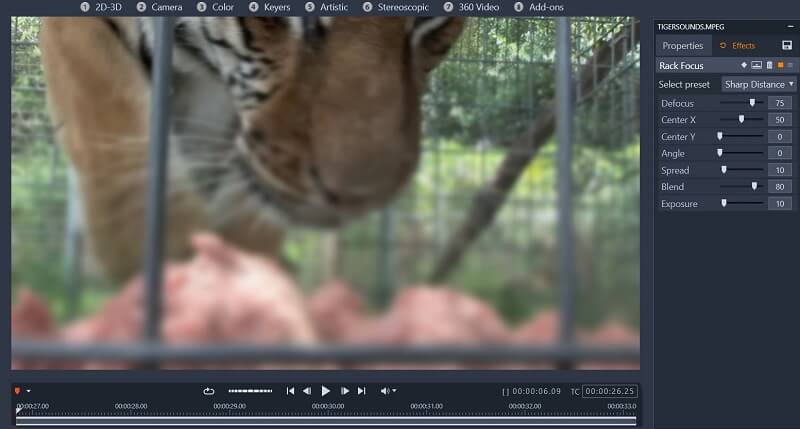
As you’d expect, the UI for applying their built-in effects is intuitive and responsive. Simply drag and drop an effect from the Library window onto a clip to apply it to your video. If you want to edit the effect, right-click on the clip and select Effect > Edit. This will bring up a secondary window that contains all of the parameters for the effect currently applied to your clip, along with a video preview window so that you can see how changing these parameters will affect your clip.
Though I was impressed by the high degree of control you have over the effects in the program, I was generally less than impressed by their functionality. The most basic effects (such as chroma keying and lighting adjustments) work as well as you’d expect them to, while the majority of the flashier effects you pay additional money to receive in the Ultimate edition were unnecessary, too slow to effectively implement, or appeared to be too low quality to be worth the additional money.
I tested out nearly every one of the “NewBlue Video Essential” effects that come included with the Ultimate edition but found that most can be replicated by using other tools within the program. Check out the first two effects in my demo video below, Detail by Chroma and Detail by Luma, and tell me if you can spot the difference between these effects and my unedited video.
I normally wouldn’t knock a program for including additional effects, but if they come at a cost, that cost should be justified. In my opinion, the additional effects you’ll receive in the Plus and Ultimate editions simply aren’t worth the additional money.
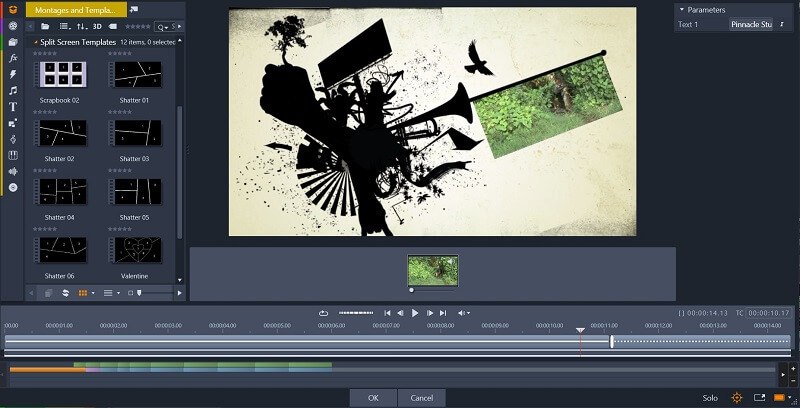
On the other hand, the templates and montages included with the software blew me away. While the templated projects in most of its competitors are too tacky to use in professional quality content, you can tell Corel spent lots of effort on making the templates look great.
I’d happily use the vast majority of the templated intro and outros with the program in commercial videos, which is something that can’t be said for the vast majority of its competitors.
This brings us to the transitions, which I was also quite impressed by. The transitions you’ll find in the basic edition are clean, simple, and highly usable, while the transitions you’ll get from the Plus and Ultimate editions tend to be flashier and have more narrow applications.
I wouldn’t recommend purchasing the Plus edition on the back of the additional transitions alone, but the strongest case for purchasing the Ultimate edition over the other two is the addition of Morph transitions. Morph transitions look great, are relatively easy to implement, practical. If you absolutely must have Morph transitions in your videos, then I think you’ll be happy with the ease and effectiveness of the Morph transitions in the Ultimate edition.
Razões por trás das minhas classificações de comentários
Eficácia: 4/5
The program is capable of generating quality videos, but it suffers from noticeable performance issues. The UI is second to none, and the effectiveness of the transitions and templates compares quite favorably to its competition. However, the overall usability of the program suffers from lag as the project increases in complexity and occasional crashes when put under strain. I also found many of the effects to be either unusable or unnecessary.
Preço: 3 / 5
The Ultimate edition will run you 79.95 dollars, which is a slightly higher price tag than its competition. I wouldn’t have a problem with the price if the additional features justify the cost, but the only feature of Ultimate which I’d really miss in the basic version is the morph transitions. I think the vast majority of users will get the most value out of the basic version for 29.95 dollars.
Facilidade de uso: 4.5 / 5
The program is organized efficiently and the workflow is intuitive, but the tutorials leave something to be desired. It took me no time at all to figure out how to use the program, as one of its greatest strengths is the exceptional usability of its UI. I found everything right where I expected it and had no problem discovering how to use new features in Pinnacle Studio. The one knock on ease of use is the tutorials, which are either incomplete at the time of writing this review or are too narrow in their scope to teach how to use the program in its entirety.
Suporte: 5/5
I’m incredibly impressed by the support which is available for the program. Corel offers live online chat, phone support, a 24-hour guarantee to respond to any email, and a 30-day money back guarantee on the program itself.
Alternativas ao Pinnacle Studio
Se você precisa de algo mais fácil de usar
Cyberlink PowerDirector is the simplest video editor I’ve ever tested and a must-buy for anyone whose primary concern is ease of use. Read my full Revisão do PowerDirector here. You may also consider TechSmith Camtasia e Editor de Vídeo Movavi.
Se você precisa de algo mais poderoso
Adobe Premiere Pro is the industry standard for a reason. Its color and audio editing tools are the best in the business, and its ability to integrate with Adobe Creative Cloud makes it an excellent choice for anyone who is already familiar with Adobe products. You can read my Revisão do Premiere Pro Aqui.
Se você for um usuário do macOS
Though it isn’t quite in the same price range as Pinnacle Studio, Final Cut Pro is the least expensive video editor which I would consider to be “professional quality”. It’s a great choice for anyone in the market for a program that strikes a balance of ease of use, quality of features, and affordability. You may also consider Filmora.
Conclusão
Pinnacle Studio looks great, is effectively organized, and offers a plethora of useful tools for making video editing as fast and painless as possible. It’s clear that Corel (the maker of the software) spent a lot of time and effort making the UI intuitive and effective, but they didn’t spend as much time as they should have on some of the fundamental features of the program. The program is full of fun bells and whistles, but at the end of the day, the videos it makes aren’t as high quality as those of its competitors.
In my opinion, if you are looking for an affordable video editor that’s well-designed and efficient, Pinnacle Studio Basic is one of the best options in the market. I wouldn’t recommend the Plus and Ultimate editions unless you really like the Morph transitions and don’t mind paying a bit more. Also, if you’re serious about video editing, consider VEGAS Pro, Adobe Premiere Pro, and Final Cut Pro (for macOS).
So, do you find this review of Pinnacle Studio Ultimate helpful? Leave a comment below.
Artigos Mais Recentes